


When you configure the Meetio apps connection to Exchange you will need two addresses:
Exchange Control Panel (ECP) – Where you administer your Exchange.
Exchange Web Services (EWS) – The web service Meetio connects to and pulls the booking information.
These are most likely to be at https://[Exchange Server FQDN]/ECP/ and https://[Exchange Server FQDN]/EWS/Exchange.asmx.
There are 2 methods to use to find the URL:
Get-WebServicesVirtualDirectory |Select name, *url* | fl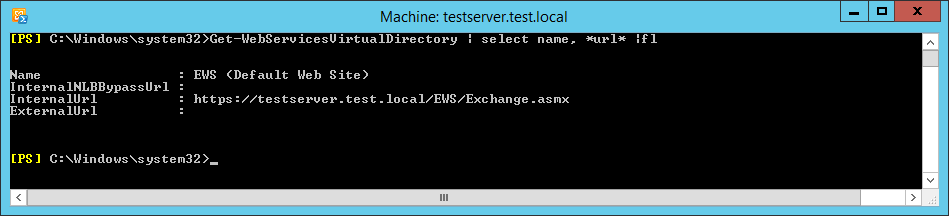
Start with setting up a ordinary Exchange user account in ECP. This account will be used by Meetio apps to connect to EWS so it will be visible when someone books a meeting directly on the tablet. Give it a intuitive name, for an example “Direct booking”.
As an alternative you can run the the following Exchange Powershell:
New-Mailbox -UserPrincipalName meetio -Alias 'Instant Booking' -Database -Name Meetio -OrganizationalUnit -Password -FirstName 'Meetio' -Displayname 'Instant Booking' -ResetPasswordOnNextLogon $false
Next step is to configure a room resource for each room you have. If this is already in place you can of course skip this step.
The service account will need full access to the room resources.
You can give full access through ECP (Recipients > Resources), choose each room resource and Edit. In the popup window choose the menu option Delegate and in the last section Full Access you click the + icon and add the service account you created in step 1.
If you rather use Exchange Powershell you can use the following command:Get-User -identity [Room Resource E-mail] | Add-MailboxPermission -User [Service Account E-mail] -AccessRights 'FullAccess'
Lastly you need to configure Meetio to connect to the service account in Exchange. Log in to Meetio Admin and follow the guide on screen.
If the guide does not start, go to Connection and press New Connection”.
Choose Exchange and enter the credentials for the Service account created in Step 1. Use the URL adress for your EWS on the form https://[Exchange Server FQDN]/EWS/Exchange.asmx.
From there you can go to Rooms to add all the rooms as created in step 2.
Your connection is now ready and you can assign your Meetio products to the various rooms.